回忆
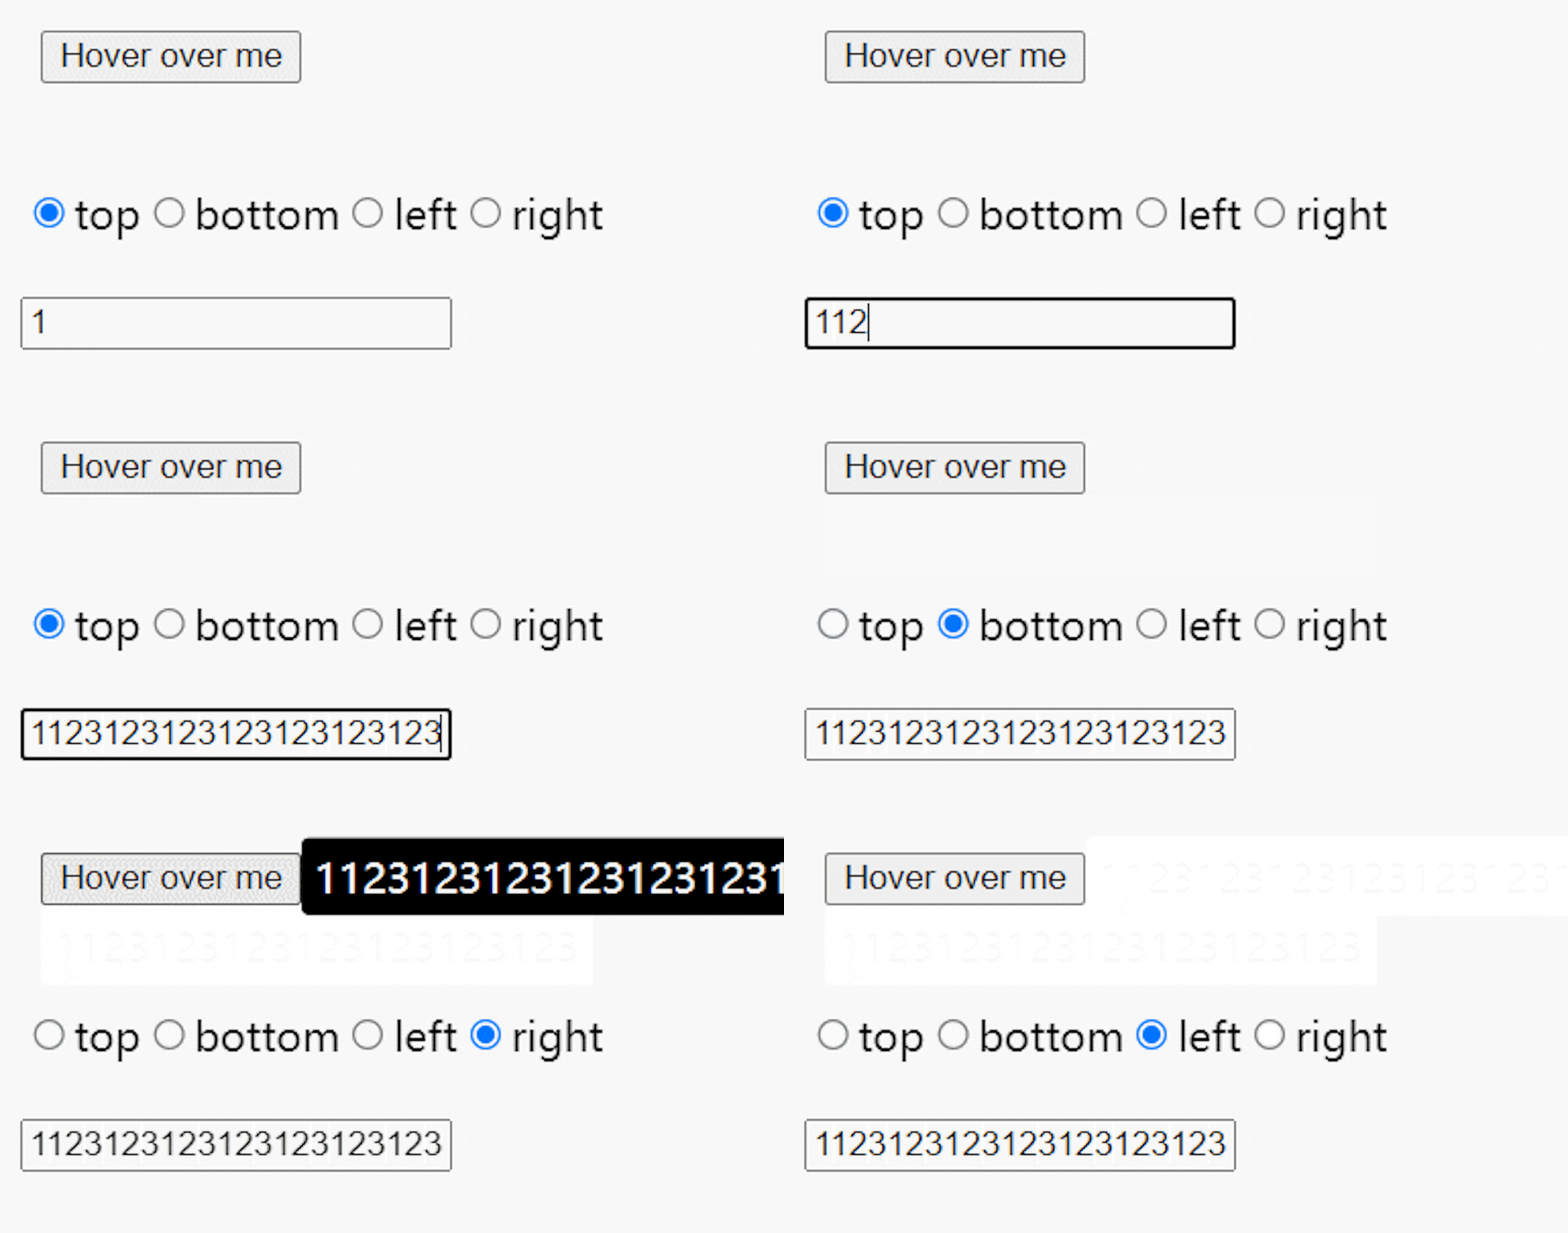
回想起我干第一份工作的时候,就遇到过这样的需求,要在地图上的点位做个特殊的 tooltip,但这个点位可能分布在地图任意一个位置,那就要确保任何情况下 tooltip 内容都是可见的(看不到点位的时候除外),比如:

左边显示不下那就往右侧显示,内容超出屏幕就往反方向移动,大概就是这样的解决方案,当年没有实现出来,现在回看,这需求只是麻烦,但并不困难。
实现悬浮显示内容
从零开始做 Tooltip 组件,首先要实现组件本身的基本功能,hover 后显示内容,这个很简单,先做一个 useHover:
const useHover = (ref) => {
  const [hovered, setHovered] = React.useState(false);

  React.useEffect(() => {
    const node = ref.current;
    if (node) {
      const handleMouseOver = () => setHovered(true);
      const handleMouseOut = () => setHovered(false);

      node.addEventListener('mouseover', handleMouseOver);
      node.addEventListener('mouseout', handleMouseOut);

      return () => {
        node.removeEventListener('mouseover', handleMouseOver);
        node.removeEventListener('mouseout', handleMouseOut);
      };
    }
  }, []);  // Empty array ensures effect is only run on mount and unmount

  return [hovered];
};
代码中的 ref 关联的是 Tooltip 容器,先监听监听是否被 hover,通过 mouseover 和 mouseout 事件来维护 hovered 状态,返回状态供 Tooltip 使用。
const Tooltip = ({ children, tooltipContent }) => {
    const childRef = React.useRef();
  const tooltipRef = React.useRef();
    const [hovered, setHovered] = useHover(childRef);

  return (
    <div
      style={{
        position: 'relative',
        display: 'inline-block',
        height: 'fit-content'
      }}
      ref={childRef}
    >
      {children}
      {hovered && (
        <div style={tooltipStyle} ref={tooltipRef}>
          {tooltipContent}
        </div>
      )}
    </div>
  );
}
tooltipRef 可以暂时忽略,是给之后的功能点预留的。
Tooltip 的基本流程很简单,在 hovered 状态下显示 content 部分,其他时候隐藏。
实现方向
这也是 Tooltip 的必备属性了,设置 content 出现的方向。
这里我们会多考虑一个情况,就是指定的方向没空间了怎么办?比如元素就在页面上方,同时方向也是 top,那么 content 必定会溢出屏幕。
这时就需要检测 content 部分的位置来判断是否应该在反方向显示,比如 top → bottom。
这里的流程是这样的:
通过
childRef拿到 Tooltip 容器的元素实例T通过
tooltipRef拿到 content 部分的元素实例C通过
getBoundingClientRect拿到对应元素的位置等信息以 direction
top为例,正常情况下能显示在顶部,但T.top - C.height < 0的时候,容器上方的位置不足以放得下 content 部分,这个时候就需要反方向显示
通过这个流程可以写出 useTooltipPosition:
const useTooltipPosition = (childRef, tooltipRef, initialDirection, hovered) => {
  // 从预设的方向初始化新方向
  const [direction, setDirection] = React.useState(initialDirection);

  React.useEffect(() => {
    const childNode = childRef.current;
    const tooltipNode = tooltipRef.current;

    if (childNode && tooltipNode) {
      // 容器的位置信息
      const { top, right, bottom, left, width, height } = childNode.getBoundingClientRect();
      // content 部分的位置信息
      const tooltipRect = tooltipNode.getBoundingClientRect();

      let newDirection = initialDirection;

            // 判断是否溢出,从而调整新方向
      switch (initialDirection) {
        case 'right':
          if (right + tooltipRect.width > window.innerWidth) {
            newDirection = 'left';
          }
          break;
        case 'bottom':
          if (bottom + tooltipRect.height > window.innerHeight) {
            newDirection = 'top';
          }
          break;
        case 'left':
          if (left - tooltipRect.width < 0) {
            newDirection = 'right';
          }
          break;
        case 'top':
        default:
          if (top - tooltipRect.height < 0) {
            newDirection = 'bottom';
          }
          break;
      }

      setDirection(newDirection);
    }
  }, [childRef, tooltipRef, initialDirection, hovered]);

  return direction;
};
接着调整一下 Tooltip 组件:
const Tooltip = ({ children, tooltipContent, direction = 'top' }) => {
  const childRef = React.useRef();
  const tooltipRef = React.useRef();
  const [hovered, setHovered] = useHover(childRef);
  const tooltipDirection = useTooltipPosition(childRef, tooltipRef, direction, hovered);

    const tooltipStyle = React.useMemo(() => {
    const style = {
      position: 'absolute',
      backgroundColor: '#000',
      color: '#fff',
      padding: '5px',
      borderRadius: '3px',
      whiteSpace: 'nowrap',
    };

        // 这里根据最终确定的方向调整 content 部分的样式
    switch (tooltipDirection) {
      case 'right':
        style.left = '100%';
        style.top = '50%';
        style.transform = 'translateY(-50%)';
        break;
      case 'bottom':
        style.top = '100%';
        style.left = '50%';
        style.transform = 'translateX(-50%)';
        break;
      case 'left':
        style.right = '100%';
        style.top = '50%';
        style.transform = 'translateY(-50%)';
        break;
      case 'top':
      default:
        style.bottom = '100%';
        style.left = '50%';
        style.transform = 'translateX(-50%)';
        break;
    }
    return style;
  }, [tooltipDirection]);

  return (
    <div
      style={{
        position: 'relative',
        display: 'inline-block',
        height: 'fit-content'
      }}
      ref={childRef}
    >
      {children}
      {hovered && (
        <div style={tooltipStyle} ref={tooltipRef}>
          {tooltipContent}
        </div>
      )}
    </div>
  );
};
实现对齐
对齐也是个 Tooltip 的基本功能,但本文的关键不是“对齐”,而是对齐导致溢出后的处理办法。
上一个章节提到方向导致溢出后,可以修改为反方向解决,其实这里还有一个问题,比如 Tooltip 在屏幕左上角,这时候应该往什么方向显示 content 呢?右侧或下方对吧。
如果 content 内容比较短,两侧都行,过长的话右侧还好说,下方的情况下,如果居中对齐,那么必定会让文字左侧超出屏幕:

所以这里我设想的解决办法是,当判断为内容过长的溢出时,修改对齐方式,左侧溢出就往左侧对齐,以此类推。
如果两侧都溢出了呢?能出现这种情况应该先骂需求不合理。
判断的流程如下:
通过
childRef拿到 Tooltip 容器的元素实例T通过
tooltipRef拿到 content 部分的元素实例C通过
getBoundingClientRect拿到对应元素的位置等信息将场景分成两类:
direction在竖直方向上(top或bottom)、在水平方向上(left或right)以竖直方向为例,在默认居中对齐的情况下,通过容器的中点 x 位置减去 content 部分的一半,可以判断是否左溢出:
T.x + T.width / 2 - C.width / 2,若结果小于 0 则左溢出同理,若结果大于屏幕宽度
window.innerWidth则右溢出其他场景以此类推
按这个流程可以完成 useTooltipAlign:
const useTooltipAlign = (childRef, tooltipRef, initialAlign, direction, hovered) => {
  const [align, setAlign] = React.useState(initialAlign);

  React.useEffect(() => {
    const childNode = childRef.current;
    const tooltipNode = tooltipRef.current;

    if (childNode && tooltipNode) {
      const { left, top, width, height, x, y } = childNode.getBoundingClientRect();
      const tooltipRect = tooltipNode.getBoundingClientRect();

      let newAlign = initialAlign;

      // 竖直方向的情况
      if (direction === 'top' || direction === 'bottom') {
          // Tooltip 中点 x 坐标
        const centerX = x + width / 2
        if (centerX - tooltipRect.width / 2 < 0) {
          newAlign = 'left';
        } else if (centerX + tooltipRect.width / 2 > window.innerWidth) {
          newAlign = 'right';
        }
      }

      // 水平方向的情况
      if (direction === 'left' || direction === 'right') {
          // Tooltip 中点 y 坐标
        const centerY = y + height / 2
        if (centerY - tooltipRect.height / 2 < 0) {
          newAlign = 'top';
        } else if (centerY + tooltipRect.height / 2 > window.innerHeight) {
          newAlign = 'bottom';
        }
      }

      setAlign(newAlign);
    }
  }, [childRef, tooltipRef, initialAlign, direction, hovered]);

  return align;
};
接着完成 Tooltip 组件:
const Tooltip = ({ children, tooltipContent, direction = 'top', align = 'center' }) => {
  const childRef = React.useRef();
  const tooltipRef = React.useRef();
  const [hovered, setHovered] = useHover(childRef);
  const tooltipDirection = useTooltipPosition(childRef, tooltipRef, direction, hovered);
  const tooltipAlign = useTooltipAlign(childRef, tooltipRef, align, direction, hovered);

  const tooltipStyle = React.useMemo(() => {
    const style = {
      position: 'absolute',
      backgroundColor: '#000',
      color: '#fff',
      padding: '5px',
      borderRadius: '3px',
      whiteSpace: 'nowrap',
    };

    switch (tooltipDirection) {
      case 'right':
        style.left = '100%';
        style.top = '50%';
        style.transform = 'translateY(-50%)';
        break;
      case 'bottom':
        style.top = '100%';
        style.left = '50%';
        style.transform = 'translateX(-50%)';
        break;
      case 'left':
        style.right = '100%';
        style.top = '50%';
        style.transform = 'translateY(-50%)';
        break;
      case 'top':
      default:
        style.bottom = '100%';
        style.left = '50%';
        style.transform = 'translateX(-50%)';
        break;
    }

    switch (tooltipAlign) {
      case 'left':
        style.left = 0;
        style.transform = '';
        break;
      case 'right':
        style.right = 0;
        style.transform = '';
        break;
      case 'top':
        style.top = 0;
        style.transform = '';
        break;
      case 'bottom':
        style.bottom = 0;
        style.transform = '';
        break;
    }
    return style;
  }, [tooltipDirection, tooltipAlign]);

  return (
    <div
      style={{
        position: 'relative',
        display: 'inline-block',
        height: 'fit-content'
      }}
      ref={childRef}
    >
      {children}
      {hovered && (
        <div style={tooltipStyle} ref={tooltipRef}>
          {tooltipContent}
        </div>
      )}
    </div>
  );
};
